Showing posts with label Internet tips. Show all posts

Monday, March 4, 2013

Mozilla Firefox for Samsung Galaxy Y an Armv6 android devices. This nightly version of Mozilla Firefox is an official version that is meant to support almost all Armv6 android devices. The current build is fennec-22.0a1. As this is a nightly build so it may have some bugs and may be unstable. There are some great features included in it like sync, save pages as pdf, install add-ons, and lets not forget it also support flash player. Here i am going to add few screenshot of Mozilla Firefox nightly running on galaxy y.

Screenshots:
  Mozilla Firefox for Samsung Galaxy Y 


So now if you want to install Mozilla Firefox on galaxy y you can download from Mozilla site still for your connivance we will provide link.

Download and Requirement:
Samsung galaxy y or any ARMV6 android smart phone.
Mozilla Firefox ARMV6 APK:(not mirrored) fennec-22.0a1.multi.android-arm-armv6.apk
Size: 24 MB

Installation:
Just install the Apk and enjoy web.

How to enable Flash supports on Firefox for galaxy y
Now open your Mozilla Firefox tab on menu (left button)
Now from menu tab on more and select setting
Now you are on Settings screen, tap on Plugins and choose Tap to play or Enabled 

To receive latest update from us like our  facebook page Techweem
Read More

Thursday, February 14, 2013

CPX Interactive one of the largest CPM ad networks to monetize your site. Hi friends as we already posted an article Best alternatives to adbrite so in that post we reviewed some good ad network which can approve you site easily with no minimum traffic requirement but now let me tell you if you have nice traffic then you can apply to some best CPM ad networks like Tribal Fusion, Advertising.com, ValueClick Media, CPX Interactive etc. So today in this article we are going to provide you with brief details on how to apply and what are the minimum requirement to get approved by one of the largest CPM ad networks known as CPX Interactive that deliver more than 3 billion daily ad impressions across every platform in more than 60 countries.
CPX Interactive one of the largest CPM ad networks
So before proceeding on how to apply and what are the minimum traffic requirements to become publisher of CPX Interactive ad networks lets have look on some of the features that CPX Interactive offers when you get approved and become publisher. The main plus point of becoming cpx publisher is ability to select alternative third-party ad networks to work with, along with their own network. As a CPX publishers you will get dashboard that shows real time reporting and also have traffic analysis tools. CPX Interactive is mainly CPM advertising network but also supports CPC, CPL and CPA models. CPX Interactive offer a wide variety of ads including banner display, pop-up, pop-under, and video pop-ups

Size of banner display from CPX Interactive for displaying ads:

  • 728×90   Leaderboard
  • 120×600 Skyscraper
  • 160×600 Skyscraper
  • 300×250 Cube
  • 180×150 Rectangle 
  • 720×300 Pop-Under
  • 425×600 Pop-Up 
  • 430×600 Pop-Up 
  • 640×480 Video Pop
  • 300×250 Video Cube
PLUS many mobile and custom sizes including video and interactive expanding units

Mode of payment: CPX Interactive pays on a net-45 basis
Paypal
Check
The minimum threshold is $100

Join CPX Interactive:
So if you want to join CPX Interactive as a publisher minimum traffic requirement for a site is 30,000 or more unique impressions per month and your site must be on top level domain example (www.example.com) Signing up is quite easy and after your site get reviewed by CPX Interactive and ready to get approved then you will you have to prove that your site have at least 30,000 unique impressions per month and your privacy policy is aligned to comply with CPX’s data use policy.
Next we will try to add some more.
To receive latest update from us like our  facebook page Techweem

Read More

Sunday, February 10, 2013

Hi friends as we all know that Adbrite.com cease operations on Feb 1, 2013 and there are lots of bloggers and site owner who use their program to monetize their website or blog but after they officially shut down there website now it is time to look for alternatives but now a days it is really hard to get approved by best Ad network like Adsense, Tribal Fusion, Advertising.com ValueClick Media, contextual ads by yahoo, CPX Interactive and few more.
Best Alternatives To Adbrite
So if you have already tried for the above listed ad network and get approve then congratulation but if not approved then its time to go with Ad networks that gets easily approved and pays you so here we are going to list few good cpm and Cpc ad networks that are good to monetize your website or blog as a publisher.
     As Google Adsense is a best way to monetize any blog or website but hard to get approve until you fulfill all the requirements. As Adsense is a CPC contextual advertising program so you get paid for the click you receive and ads are displayed depending on the Keywords so it is good as because ads displayed on your site or blog is related to you Articles they display Banner and text-ads on your blog or site now feed ads are no more.


1. PulsePoint: PulsePoint is a CPM advertising network as it is a cpm ad so no clicks are required to generate revenue you get paid for impression you can set your own cpm (cost per mile or cost per thousand) impression rate then generate the code you are also allowed to place backup tags (means ads from other network) so when PulsePoint don't have ads for your site based on askprice then backup tag will be activated and the alternate ad will be displayed on your site. Insipite of low fill rate backup tags option fulfill this.
There is no minimum traffic requirement for joining PulsePoint still after applying you will have to wait for few days for getting approved and when approved create "Ad Tag groups" within which you can create "Ad Tags" specify a backup tag and price generate adcode and place ad on your site or blog.

Size of banner from PulsePoint for displaying ads:
  • 728×90 Leaderboard
  • 300×250 Medium Rectangle
  • 120×600 Skyscraper
  • 160×600 Wide Skyscraper
  • 300x600
  • 700x500
Mode of payment
Electronic Funds Transfer (US Only)
Paypal
Check
Te minimum threshold is $50

2. Chitika
Chitika is a CPC, CPM advertising network so revenue generation depends upon click and impression.The Ads are displayed base on search-target. As anounced by chitika on their blog in August 2012 that they are now supporting all countries worldwide. Recently chitika included new type of ads in its program currently in beta stage known as ChitikaApps(beta) it has three types of ads. 


  • Chitika Linx: Chitika Linx are in-text ad units.
  • Chitika Hover: These ads will hover on the bottom right corner of your site.
  • Chitika Highlight: These ads will appear when visitor will select some words or paragraph on your site.
You can join chitika but if you have good traffic then it is good because Chitika have 3 levels of ads Gold, Silver, and Bronze. The site with gold account has tier 1 advertisers , Silver has tier 2 advertisers and Bronze has tier 3 advertisers. This levels are determined by the no of impressions your website generates so if your account gets approved as gold it is better. After applying it takes some time to get approved. After approval you can generate ad code and monetize your site. Chitika also provide Fallback Options so you can use alternate ad in same space if no ad available.


Size of banner from Chitika for displaying ads:
  • 550x250 Mega-Unit
  • 728x90 Leaderboard
  • 120x600 Skyscraper
  • 160x600 Skyscraper
  • 468x250 Mega-Unit
  • 468x180 Blog Banner
  • 468x120 Blog Banner
  • 468x90 small Blog Banner
  • 468x60 mini Blog banner
  • 550x120 Content Banner
  • 550x90 Content banner
  • 450x90 small content banner
  • 430x90 small Content banner
  • 400x90 small content banner
  • 300x250 Rectangle
  • 300x150 Rectangle wide
  • 300x125 mini Rectangle Wide
  • 300x70 mini Rectangle Wide
  • 250x250 Square
  • 200x200 small Square
  • 160x160 small square
  • 336x280 Rectangle
  • 336x160 Rectangle Wide
  • 334x100 small Rectangle Wide
  • 180x300 small Rectangle Tall
  • 300x70 mini Rectangle
  • 180x150 small Rectangle.
Mode of payment: Chitika pays on a net-30 basis
Paypal (minimum payout is 10$)
Check (minimum payout is 50$)

3. InfoLinks: InfoLinks is a CPC, CPM In-Text advertising network so revenue generation depends upon click and impression. This ads does require space on your site as it is an In-Text ads the ads appear within the text of your article and when mouse over those text keywords and phrases get converted into advertising links. There are few more formats of ads provided by them
  • InSearch: "InSearch displays relevant ads to traffic arriving to your site from search engine."
  • InTag:  Add tags within your website's content.
  • InFrame: "Based on category of your site display banner ads in the margins of your website’s pages."
There is no minimum traffic requirement for joining InfoLinks still after applying you will be approved log in your and use 1-Minute Integration place ad code within body of your site or blog html and soon ads will begin appearing on your blog or site.

Mode of payment: Chitika pays on a net-45 basis
Paypal (minimum payout is 50$)
echeck/ local bank transfer (minimum payout is 50$)
Wire transfer (minimum payout is 100$)
Payoneer debit card (minimum payout is 50$)

Now time to make money Next we will try to add few more WK49CH64ZKFU

To receive latest update from us like our  facebook page Techweem

Read More

Tuesday, February 5, 2013

Hi friends Google PageRank has been updated today, the last PageRank was updated in November 2012 So this is the first Google PageRank update of 2013 as we can see that Google is updating page rank quarterly means at the difference of three months so we can hope that the next page rank will be in May 2013. So if you want to check latest page Rank of your Site or blog you can check using Google Toolbar or there are many sites that will do it for you for your. Example
Google PageRank updates by years and months detail:

Page rank update in 2013
  • February 2013
Page rank update in 2012
  • November 2012
  • August 2012
  • May 2012
  • February 2012
Page rank update in 2011
  • November 2011
  • June 2011
  • January 2011
Page rank update in 2010
  • December 2010
  • October 2010
  • June 2010
  • June 2010
  • April 2010
Page rank update in 2009
  • December 2009
  • October 2009
  • May 2009
  • April 2009
Page rank update in 2008
  • December 2008
  • September 2008
  • July 2008
  • April 2008
  • January 2008
Page rank update in 2007
  • October 2007
  • April 2007
  • January 2007
Page rank update in 2006
  • April 2006
  • July 2006
  • September 2006
Page rank update in 2005
  • January 2005
  • March 2005
  • July 2005
  • October 2005
This time our blog Techween.blogspot.com has gain its first page rank as             +1  and our our other blogs retained its previous page rank. Congratulate everyone whose page rank rise or did not drop down.

Share your PageRank with us
So, did your site or blog PageRank change and how are you feeling ?
Let us know by commenting below


Read More

Tuesday, January 22, 2013

In this world of high-speed technology, everyone seems to be smitten by the idea of fast and easy results. Unfortunately, reality is far from this. No matter what anyone has told you, business blogging doesn't give fast and easy results. You have to master the art of writing, understand the ever-changing facets of technology and keep pace with the interests of your audience. You have to regularly post blogs, upload related images and, not to mention, respond to reader’s questions. Hiring an assistant would make a lot of sense but if you are working on a shoe-string budget (like most of us) then these 5 core blogging essentials should help your business succeed.
Make your Blogging efforts Consistent:
One of the main aspects of business blogging is creating quality content and posting them regularly. The more blogs you post, the more traffic you’ll be able to generate. It’s a known fact that Google recognizes and recommends sites that have new and updated information on a regular basis. But before jumping into the wrong conclusion that by blogging regularly you’d be able to improve your site’s lead generation overnight, remember that it takes a lot of time and effort.
Make Friends with WordPress:
Make friends with WordPress, as it houses all your blog posts. WordPress comes out with a number of updated versions and it is important that you stay updated too. Make sure you don’t have any unauthorized blogs and empty fields. Make use of tags and keep checking the status of your dashboard. Your dashboard gives you a complete summary on the number of posts you currently have, the number of comments and the information on all those linking to you. These stats are there for a reason, so it’s better to make use of them.
Track Traffic Movements:
Keeping track of the number of people visiting your blog is the only way to know if your blogging efforts are bringing business. Some of the stats you should keep an eye on are page views, landing pages, the time spent on your site, number of visitors and referring sites. There are a number of analytic tools available for tracking traffic.
Retain Reader Interest and Engage with Them:
The main aim of business blogging is to connect with readers and syncing your blog content with the needs and problems of readers. Here, you might want to restrain using your sales pitch.  Readers are interested in learning and want to acquire quality information. When they get this, they’ll even reward you with their time and energy.
Design a Compelling Call to Action
This is where you should go beyond the mundane ‘Call us now’ line. Think of a compelling call to action, which will induce readers to divulge their personal information. Readers would be willing to give their details only when they know that there is something useful and valuable in it.
Yes, it is a tough job. With a business to maintain, you’ll have to find time for blogging. But once you start blogging, you’d find it simple, enjoyable and engaging.

Guest Author
Bylines Randy Collins likes writing articles related to Technology News, Gadget Reviews and How To. He also does guest posting for buycharter.com - a site that offers savings and current information on charter internet.
Read More

Saturday, December 22, 2012

Hi friends as we know that on any smartphone web browser is one of the must have application so that you can browse your favorite site but now here is a option for you to create your own web browser of your own custom style that look different from others and the most important thing is that you don't have to know coding for creating your own web browser so here we are going to provide you an step by step instruction on how to create your own web browser app with out knowing coding. Here we have created one for you can try it out
techween web browser free for your android phone and tablet

Download: Techween web browser v2.7.2.apk

Features:
  • Add your own custom Name for your browser.
  • Add your own custom browser icon.
  • Set default homepage of your choice.
  • Select a theme/skin of your choice from available more then 10.
  • Add your own custom splash screen.
Requirement:
  • A computer with active internet connection.
  • An android smart phone to install your browser

Steps to create your own customized browser for android
  • First of all create browser icon JPG or PNG, < 50KB, 72x72 pixels
  • Thee create splash screen PNG or JPG, <500KB, 480x800 pixels
  • To create your browser icon and splash screen you can use Photoshop or any other photo editing application of your choice.
  • Now open your browser and open this online application by Maxthon and click on make it now You will be taken to the next screen where you will have to Add Name, icon, home page, theme/skin, splash screen and your email address and click on create android browser.
  • This will take 2-3 minutes and your custom browser is ready for download  now download and install it.
Visual steps:
Create your own web browser free for your android phone and tablet
To receive latest update from us like our  facebook page Techween
Read More

Saturday, December 15, 2012

Hi friends here we are going to provide you step by step instruction on how to unlock ZTE MF190 usb dongle. So follow the instruction carefully to unlock your USB dongle successfully.
Requirements:
A computer running on windows with driver installed.
A Locked ZTE MF190 usb dongle.
DOWNLOAD: DC UNLOCKER 2

Warning:

Use at your own risk

INSTRUCTION:
  • First of all remove memory card if it is inserted and then remove the combo sim card and insert SIM card of your choice for which you want to unlock. 
  • Now plug in the dongle in the usb port of your computer and and install the software and driver.If already installed not required. 
  • Now run the connection manager it will display a message saying invalid sim or something similar to it. 
  • Now cancel it and close the connection manager, don't unplug the dongle. 
  • Now unzip or extract the downloaded file DC UNLOCKER 2.zip and place on desktop. 
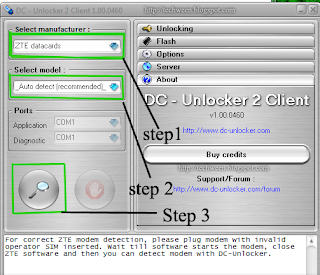
  • Now Run the file dccrap.exe from the extracted folder see the pic below.
How to unlock ZTE MF190
  • Now under the section select manufacturer select "ZTE datacard", step1 in picture below. 
  • Now under the section Select model let it be default "Auto detect (Recommended)", step2 in picture below. 
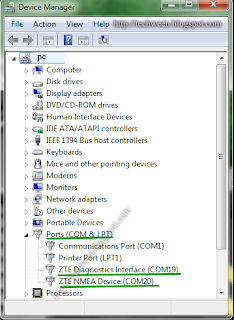
  • Now let the com port to be select you can find com port in device manager of your pc see the pic below.


  • Now click on search button as shown in picture above step 3. 
  • After that your usb modem will be detected and shown in message box see the picture below.
  • Now select the unlocking tab and then click on Unlock step 4 in above picture If you modem is unlocked you will receive a message card successfully unlocked.

Congratulation you have learned how to unlock ZTE MF190 usb dongle successfully.

Source:
Read More

Monday, December 10, 2012

How to Add Blog And verify on Technorati
Technorati is a blogs searching engine. Technorati is an important source which helps the webmasters by helping them to index their blogs in search engines. If your blog is registered in technorati, it will appear in search engine and will be certainly visited by lots of users, it will lead to increase your blog rank.In order to enjoy this benefit the publisher will have to Add their blog in Technorat.
Follow the Simple steps to register and Add your blog in Technorati.
If already registered user visit Login Technorati.
If not registered user visit Sign In Technorati and register.
Now login your account and click on your Member name (user ID) left to your profile picture.
Now Scroll down to My Claimed blogs and enter your blog address in start a blog claim box.
Now click on claim button.
Now you will receive mail for verification. Verifying your Blog
Log in and go to account scroll down to My Claimed blogs
You will see your blog appears there click on Check Claim.
you will see a message that says to publish unique code on your blog, or you will receive a mail that contain claim token as ours RDWJ3Z34BSSM(my blog claim token).
Now you will have to publish this claim token in your blog RDWJ3Z34BSSM (my blog claim token). Use your own claim token that you received for your blog.
It must also appear in your corresponding RSS feed once published.
Once you published, your post click on "Verify Claim Token" button in Verify Your Claim Token.
If all goes well, Technorati will visit your blog, find the token and verify it.
Don't forget to leave a Comment
Read More

Friday, November 9, 2012

Add Twitter Follower Box Widget to Blogger.As we all are familiar with Facebook Like Box and we can see this on almost every blog and site because it helps in increase followers or likes of your site or blog. Normally you can add Twitter Buttons, widgets, logos, etc from twitter for Website but we are talking about Twitter Follower Box Widget which is similar to Facebook Like Box.This will help in increasing twitter fans and followers of your blog.The visitor of your site or blog can find which of their friends are following your blog so it gives a more social blend and help in driving more traffic to your blog. The code of this cool widget is created by Mark Carey thanks to him for creating this.
Add Twitter Follower Box Widget to Blogger
Steps to add Twitter Follower Box Widget For Blogger.
  • Go To Blogger Dashboard > Design > page elements. 
  • Click on Add a gadget > Select HTML/JavaScript widget 
  • Paste the code below inside and save it
<start twitter fan box –><script type="text/javascript"
src="http://s.moopz.com/fanbox_init.js"></script><div
id="twitterfanbox"><script
type="text/javascript">fanbox_init("TechWeeM");</script
type="text></div
id="twitterfanbox"><div style=”font-size:8px;”> <a href='http://www.techweem.com/2012/11/add-twitter-follower-box-widget-to.html'>Twitter Followers Box</a></div> <!– end twitter fan box –></!–></start>
Alternatively Can download code here
See Live Demo in footer column of this site.

Change "TechWeeM" with your's twitter username name.
Save your widget and you are done.
Don't forget to follow us
Read More

Thursday, November 8, 2012

Tutorial how to place Google Adsense ads inside blogger every post of your blogspot blog.If you want to place Google Adsense Ads Code inside your every post (say already posted post and upcoming posts of your blog) then first of all you will have to parse the code. If you have a blog and have Adsense approved account you can easily place your Adsense ads just by using inbuilt Adsense gadget or by generating Adsense code and placing it in HTML/java script gadget in the side bar of the blog. But here we are going to show you how to place ads inside the post.  So if you want to display your Adsense ads in the middle of your post the follow the steps below:


  1. First of all log in your Adsense account and generate the ads code copy it and paste it on notepad.
  2. Now next step is to parsed the code here we will phrase our code manually to parse the code we will have to replace the following symbols to html tag.
  • < = &lt;
  • > = &gt;
  • " = &quot;
    After parsing your code will look as shown below
    &lt;script type=&quot;text/javascript&quot;&gt;&lt;!--
    google_ad_client = &quot;ca-pub-xxxxxxxxxxxxxxxx&quot;;
    google_ad_host = &quot;pub-xxxxxxxxxxxxxxxx&quot;;
    /* mediumsquare */
    google_ad_slot = &quot;xxxxxxxxxx&quot;;
    google_ad_width = 300;
    google_ad_height = 250;
    //--&gt;
    &lt;/script&gt;
    &lt;script type=&quot;text/javascript&quot;
    src=&quot;http://pagead2.googlesyndication.com/pagead/show_ads.js&quot;&gt;
    &lt;/script&gt;

    If you can't do manually then paste your code in HTML parser below and it will do it for you.

    Placing the code


    • Now log in to your bloggers dashboard click on layout and select Edit HTML.
    • Then select the check button saying "Expand Widget Templates"
    • Now click inside the html edit box and press Ctrl+F a search box will appear copy and past this <data:post.body/> in the box and click next
    • Then look for the code something similar as shown below


    <div class='post-body entry-content' expr:id='&quot;post-body-&quot; + data:post.id'>
    <data:post.body/>
    <div style='clear: both;'/> <!-- clear for photos floats -->
    </div>

    • Then past the parsed code just before the above code as shown below.

                     <b:if cond='data:blog.pageType == &quot;item&quot;'>                              
                                    <div style='float:right;padding:5px;'>
                                    parsed code [insert parsed code here]
                                                        </div>
                                                         </b:if>

    • Now click on preview button to see the result the ads will appear between post title and post it may take some time for your ads to be active say 5 to 10 minutes keep passions.

    Then save the template all done enjoy.
    Read More

    Wednesday, November 7, 2012


    Map Domain name bought from BigRock with Blogger. In my previous post few months before i have written a tutorial how to map Dot Tk domain in bloggers .So this time i am going to write how to map a domain name bought from BigRock in bloogers. Whats Domain name? Domain Name is an unique address of a website that is use open that particular website. So here are the steps to map domain mane bought from BigRock with your blogger blog.


    • First requirement is a blog that you want to map with custom domain.
    • Second a Top Level Domain name (.com, in, .co, .info, .org, .co.in,etc..) according to your need,  choice and availability.
    So if you have not already bought a domain name visit Bigrock.com there type a name that you consider to be your's blog name then select domain type from drop down menu and click on go it will take you to next page where it shows whether the domain name is available or not if available select the period of time you want to book it for say 1 year or more up to you. Now scroll down and click on continue In the next page you can use this coupon code "rootingpalace.comand will get discount ( Domains / Digi Cert / BIFM : 10% and Web Hosting / Email Hosting / DIY : 15% ) Now log-in or create account to log-in and make payment according to method of your choice.
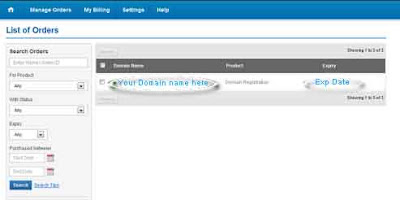
    Now login to your bigrock account, it will show the domain that you have already bought as shown in the pic below. This shows you the details of the product that u bought from them in your case the domain name. Click on the domain name you will be taken to next page.
     BigRock with Blogger.
    When you click on your domain name it will open a new window showing detailed informations about the domain name that you have bought. Now look on the right sidebar and select "DNS Management" as shown in picture below
    Tutorial how to map Domain name bought from BigRock with Blogger.


    Now on the left hand side under DNS Management click on "Manage DNS" a new pop up window will appear showing many tabes A Records, AAAA Records, MX Records, CNAME, etc. Dont worry for configuring our domain name with blogger only two of them are required A Records and CNAME Records. So no need to get into deep for it.
    Tutorial how to map Domain name bought from BigRock with Blogger.
    Select A Records tab and click on "Add A Record" a window appears fill the details as shown below
    Host Name: Leave this field blank(As because it is for your primary domain)
    Destination IP Address : 216.239.32.21
    Leave rest of the things as it is and click on Add Record
    Tutorial how to map Domain name bought from BigRock with Blogger.
    After that add three more A Records with the IP Address that are listed below

    216.239.34.21
    216.239.36.21
    216.239.38.21

    On the completion of adding all the four A Records, from the main tab click on CNAME Records and click on Add CNAME Record and enter the details listed below
    Host Name : www.
    value : ghs.google.com
    and Click on Add Record
    Tutorial how to map Domain name bought from BigRock with Blogger.
    Congratulations all the required step completed. Now the final step adding the custom domain in blogger to achieve top level domain for the blog. Now go to blogger.com in the dashboard click on settings of the blog to which you want to add the custom domain after that click on publishing and then on link saying switch to Custom domain.
    Tutorial how to map Domain name bought from BigRock with Blogger.
    You will be taken to next page there click on link saying Already own a domain? Switch to advanced settings
     BigRock with Blogger.
    Enter your custom domain that you bought and configured in the steps above under your domain with www.  and Save
    Tutorial how to map Domain
    All the steps are completed Congratulations Now your blog is on top level domain
    Wait for few hours in some case it may take upto maximum 24 hours to process and become live.
    Read More

    Wednesday, June 20, 2012

    Google Adsense is not only a way to monetize blog or site there are other alternatives
    Few best alternatives to Google AdSense to earn money for your content on blog or site. Google Adsense is not only a way to monetize blog or site there are other alternatives. As a blogger or website owner you know that Google AdSense is #1 contextual advertising network. There are lots of bloggers who are making hundreds of dollars from from Google but not all because as a new blogger or site owner may neglect some AdSense ToS unknowingly and then it will become very difficult for them to get approved from Google AdSense and even after getting approval if Adsense ToS are neglect will get banned by Google from the Adsense. So what to do if don't have an approved AdSense account or get banned for neglecting Tos of Google AdSense. Now the question arises how to monetize the blog the best answer is to look for Adsense alternatives.

    So here i am going to list few adsense alternatives which you can use to monetize your blog (based on my own experience and a few points from other)

    chitika is one of the most popular advertisement network and a nice alternative to adsense offer text, map, mobile ads in different size according to need of you space available Payment: Minimum payout of $10 is offers through PayPal and for Check $50.
    Adbrite: 
    Adbrite Adsense alternatives
    Adbrite is one of the most popular advertisement network can be considered as the best alternative to Google AdSense. Adbrite have three different types of provision for displaying ads on your site Banner and or Text Ads, Full page ads and Inline ads some are CPM and some are CPC. The terms and conditions of Adbrite are much more relaxed but presently they are not accepting blog or site if it is hosted on free web hosting service or if not on top level Domain etc. payments are made through check.

    BidVertiser:

    Bidvertiser is also a good alternative to Adsense Bidvertiser have Different types of ads formate you can use there Banner and or text ads in your blog or website they have XML Feed and Mobile Banner ads for mobile version of your blog or site . Bidvertiser allow you to manage the and placement & style of ads with greater versatility Best for high traffic blogs. Payment: Minimum payout of $10 is offers through PayPal and Skrill/MoneyBookers, for Check $100 Minimum and for Wire $500 is Minimum.

    Infolinks:
    Adsense alternatives infolinks
    Infolinks are specialized in In-Text advertising their ads are shown on your page along with words based on the keywords and phrases on your page which does not contain any link are converted to advertising links.Different ads type they have are In-Text, Related Tags, Tage Cloud and Search Widgets Their ads are Pay per Click Best thing is that you can use infolink ads with other advertising program.Payment: They pay you either by Wire transfer($400 min), echeck, payoneer or paypal ($50 min).

    cpm.biz

    Well this is just new and and i have just now registered it looks good lets see i will discuss about it latter.Payment: They pay you either by Alertpay (minimum $1), paypal (minimum $5), etc and the payment is based on day so no need to wait too long if you have good traffic. To see the examples of ads runing  click here

    There are many other monetizing programs also here i have share my own experience choose the one that best suit you and start earning.
    Read More

    Friday, April 27, 2012

    Tutorial how to add watermark to the pictures online after uploading to the bloggers blog. As suppose you have written a post and uploaded a picture in your post and published your post, but you have forgotten to add watermark to your picture now if you want to add watermark to your picture either you have to add watermark to your picture using any picture editor then re edit your post remove the previous picture and upload the picture with watermark and republish your post.But what i am going to say is that add watermark to already uploaded pictures on your blog post that have been already published.
    watermark to pictures already uploded to blog

    Simple steps are below just follow:
    • Log in to Google account.
    • From the top menu at Google.com click on more and select photos.
    • Now select Albums from the tab
    • Now select the album in which u have the photo to which you want to add watermark.
    • Use chrome for best result select the photo and click it.
    • On the upper left side click on creative kit it will take 5 to 10 min. depending on your net speed.
    • Now click on text tab it will take again few min.
    • Now enter the words or sentence that you want to appear on picture select, font, select font size, adjust position, set color of your choice,etc
    • After you are satisfied with customization  click on save a confirmation box appear click on replace.
    All done........
    Read More

    Tuesday, March 20, 2012

    Today here i am going to share my own experience with you on how to drive traffic to your blog and i hope you will find it helpful. Here i am just going to share only the things that i did and now my blog is getting good traffic around 3500-4500 page view per day not bad for my new blog "androidonkey.tk" which is only 4 to 5 months old. As now a days creating a blog is very easy and free but now the question is if you have blog with lots of useful information but it does not have visitors then all your hard work goes to vain. Here are the few main reason why a blog may not get traffic if your page is not appearing on the first page of search engine because search engine is the best way to drive lot of meaningful traffic to your blog next reason is that your previous visitor may not remember your blog address so how to over come this and get traffic to your blog.
    Steps to increase traffic:
    write meaningful, long and original post in your blog the post should contain few keywords this help you to get listed on first page of search engine(seo).
    Do not try to copy contain from other site.
    Try to promote your blog on social networking site like face-book, twitter, ibibo,etc. help you to drive few extra traffic.
    Don't try to re-edit your post this may lead to lose your search engine rank to that particular post.
    Try to submit article to article directories with your blog address included in your article
    Your blog must contain subscribe by mail, subscribe by rss, bookmark button etc. which make easy for your readers to remember your address and they get updated when ever your blog have a new post in this way you can retain your readers.
    Always try to update your blog with new post at regular interval of time so that your readers get new information.
    Don't try to keep pop up ads or something similar to it that may disturb your readers.
    Try to write your blog which is simple and easy to understand never try to use short form or complicated words (bombastic words).
    Try to exchange links with other blog or site this will help you to get few more traffic and good page rank
    Try to comment on blogs that allow do follow links.(your comment should include your blog link )
    Try to use simple and nice template, widgets should be placed in correct manner, your blog should be easy to navigate, the font color and body color must be selected in such a way that it is easy for your readers to read your post.
    Don't try to place flash and too many graphics because this will increase page load time.
    Try to place link to related post (example: if you are a new blogger and want to get free domain click here) Now most important thing place link in such a way that it opens in new tab other wise your reader navigate away from your page this leads to increase bounce rate of your blog.
    Try to answer question of your readers with helpful answer.
    There should be an option for guest posting in your blog or try to invite blogger who can write post for your blog as a guest author (if you want to write for us then click here an fill the form)
    Try to use picture or videos that best explain your post some times picture or videos can provide more details then words.
    Always try to write blog on topics in which you have experience.
    Last thing that i will like to say submit your blog to search engine. This are the few points that i have experienced and now sharing with you to get traffics to blog if you have any more suggestion then please feel free to leave comment below.
    Read More

    Wednesday, March 14, 2012

    Tutorial how to map Dot TK Domain in blogger.As we have already introduced to you about Dot TK in our blog few months ago but if you have missed it then just check out here. If you are a new blogger and want to register free Domain name for your blog then it is possible with dot tk.With dot tk you can either do URL Forwarding, your own name servers or Dot TK DNS Service to point your domain to the right content example of our blog click here . So to day we will just tell you how to map Dot TK Domain in blogger for free But don't map a domain if you are not ready to promote your website. Otherwise, you have to make sure that you have at least 25 site visits within 90 days or Dot TK will delete your domain. Paid Dot TK domains are free from an obligation. If you want to get paid domain from dot tk for free it is possible which we will cover in our coming post but now lets us come to our main topic that is how to map Dot TK Domain in blogger.
    So here are the steps that you have to follow:
    First of all you will have to go to dot tk click on image below to go to dot tk or click here


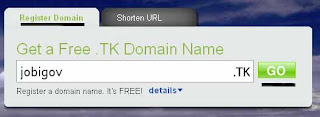
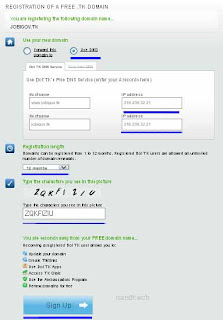
    Now select Register Domain tab and enter a desired domain name that you want to register and click on GO as shown on picture below.


    Now you are proceeded to next page select the radio button saying Use DNS in Use your new domain category and select the tab Dot TK DNS Service in both the host name fill the value IP 216.239.32.21 actually there are four different ip but at present only this one is only working. Then enter the time period min 1 month max. 12 months, Type the verification Code and click on sign up.As shown in picture below


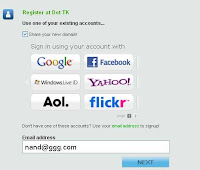
    Now sign in using your existing account from Google, face book, etc. or use your mail address to sign-up.


    As now you are registered just click on log in on the upper rhs of the page and select Domain panel


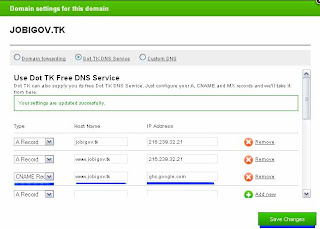
    Now click on your domain name here www.jobigov.tk click on yours a pop up windows appear now select type to CNAME Record from drop down menu and Add host name with "WWW" example www.jobigov.tk and in IP add "ghs.google.com" and click on save changes.As shown in picture below:


    Now as we have registered our free domain and activated it so now lets go to our blog.
    Blogger Configurations
    Log-in to your Blogger account.
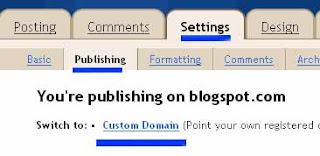
    Go to Settings >> Publishing >> Custom Domain

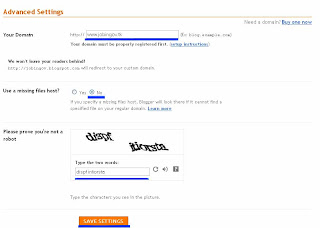
    Now click on Already own a domain? Switch to advanced settings. Now fill up the form Make sure you entered properly your Dot TK domain on the domain box. fill up the verification code and Click Save and you are done for Blogger.see the picture below:


    Now our blog www.jobigov.tk is on top level Domain congratulation.Changes don't take effect immediately. It might take an hour or two. Just keep checking your Dot TK domain.
    Need any assistant leave comment.........
    Read More
    Related Posts Plugin for WordPress, Blogger...
    Google Google+