Showing posts with label computer Tips. Show all posts

Thursday, June 11, 2020

Mi laptop to launch on June 11 2020 in India: Xiaomi is ready to enter the laptop market in India on 11 june 2020. The new Mi Notebook lunch in india on June 11, at 12 noon. This is an online event and will be streamed on Xiaomi’s YouTube and social media channels. Rumours was that the upcoming Mi laptop will be similar  to versions of the RedmiBook 14 that’s available in China only presently. but according to Xiaomi confirmation that June 11 will be a global launch of this laptop his means India will be the first to get this version of Mi Notebook.


specifications and price  coming soon
Read More

Thursday, August 24, 2017

Install Android Nougat 7.1 on x-86 based PC or laptop. As we know that recently Google's mobile operating system Android Android Nougat 7.1 has been lunched and now we can test this flavor on our x-86 based computer or laptop .This is ported by Chih-Wei Huang for X-86 based machine. What is new in latest android Lollipop It’s fast. Even better, the latest version of Android-x86 comes with Material design, improvements in notifications, internal changes to the platform and improve and optimize battery usage.
As in our previous article we have already posted how to make boot-able USB of Android x-86 and install Android on x-86 based PC or laptops But if you are new here then you can visit our previous article where we have already posted tutorial on how to make bootable USB of Android x86 ISO and install it on PC or laptop as the procedure will be same.

Download:
First of all you will have download Android  7.1  Nougat(android-x86-7.1-rc1.iso

Installation:
  • Now if you have downloaded the .ISO 
  • Now lets move to the next step that is making boot-able CD or USB:
  • As now you have downloaded the Android 5.1  ISO for your PC or laptop now you can either burn boot-able CD or make a boot-able USB. I hope all of as know how to burn boot-able image to CD or DVD.
  • So if you want to install from usb you will have to make your usb bootable. For tutorial click here
  • Now lets move to the next step Installation:
  • As i have already posted article before how to install android on x-86 based PC or laptop if escaped click here
Next Android 8.0  for x86 PC or laptop
enjoy..............
Read More

Thursday, December 24, 2015

Install Android 5.1 Lollipop on x-86 based PC or laptop. As we know that recently Google's mobile operating system Android Android 5.1 Lollipop has been lunched and now we can test this flavor on our x-86 based computer or laptop .This is ported by Chih-Wei Huang for X-86 based machine. What is new in latest android Lollipop It’s fast. Even better, the latest version of Android-x86 comes with Material design, improvements in notifications, internal changes to the platform and improve and optimize battery usage.
As in our previous article we have already posted how to make boot-able USB of Android x-86 and install Android on x-86 based PC or laptops But if you are new here then you can visit our previous article where we have already posted tutorial on how to make bootable USB of Android x86 ISO and install it on PC or laptop as the procedure will be same.
Download:
First of you will have download Android 4.3 jelly bean: Android-x86-5.1-rc1.iso

Installation:
  • Now if you have downloaded the .ISO 
  • Now lets move to the next step that is making boot-able CD or USB:
  • As now you have downloaded the Android 5.1  ISO for your PC or laptop now you can either burn boot-able CD or make a boot-able USB. I hope all of as know how to burn boot-able image to CD or DVD.
  • So if you want to install from usb you will have to make your usb bootable. For tutorial click here
  • Now lets move to the next step Installation:
  • As i have already posted article before how to install android on x-86 based PC or laptop if escaped click here
Next Android 6.0 Marshmallow for x86 PC or laptop
enjoy..............
Read More

Saturday, August 3, 2013

Install Android 4.3 jelly bean on x-86 based PC or laptop. As we know that recently Google's new mobile operating system Android 4.3 jelly bean has been lunched so now we can test this flavor on our x-86 based computer or laptop .This is ported by Chih-Wei Huang for X-86 based machine. What is new in latest android jelly bean It’s fast. Even better, the latest version of Android-x86 comes with access to the Android Market, which means you can try out thousand of Android apps from Android Market which is now known as Google Play.

As in our previous article we have already posted how to make boot-able USB of Android x-86 and install Android on x-86 based PC or laptops But if you are new here then you can visit our previous article where we have already posted tutorial on how to make bootable USB of Android 2.2 x-86 ISO and install it on PC or laptop as the procedure will be same.
Install Android 4.3 jelly bean on x-86 based computer or laptop
Download:
First of you will have download Android 4.3 jelly bean: Android-x86-4.3.iso

Installation:

  • Now if you have downloaded the .ISO 
  • Now lets move to the next step that is making boot-able CD or USB:
  • As now you have downloaded the Android 4.3  ISO for your PC or laptop now you can either burn boot-able CD or make a boot-able USB. I hope all of as know how to burn boot-able image to CD or DVD.
  • So if you want to install from usb you will have to make your usb bootable. For tutorial click here
  • Now lets move to the next step Installation:
  • As i have already posted article before how to install android on x-86 based PC or laptop if escaped click here


enjoy...............
Read More

Saturday, December 15, 2012

Hi friends here we are going to provide you step by step instruction on how to unlock ZTE MF190 usb dongle. So follow the instruction carefully to unlock your USB dongle successfully.
Requirements:
A computer running on windows with driver installed.
A Locked ZTE MF190 usb dongle.
DOWNLOAD: DC UNLOCKER 2

Warning:

Use at your own risk

INSTRUCTION:
  • First of all remove memory card if it is inserted and then remove the combo sim card and insert SIM card of your choice for which you want to unlock. 
  • Now plug in the dongle in the usb port of your computer and and install the software and driver.If already installed not required. 
  • Now run the connection manager it will display a message saying invalid sim or something similar to it. 
  • Now cancel it and close the connection manager, don't unplug the dongle. 
  • Now unzip or extract the downloaded file DC UNLOCKER 2.zip and place on desktop. 
  • Now Run the file dccrap.exe from the extracted folder see the pic below.
How to unlock ZTE MF190
  • Now under the section select manufacturer select "ZTE datacard", step1 in picture below. 
  • Now under the section Select model let it be default "Auto detect (Recommended)", step2 in picture below. 
  • Now let the com port to be select you can find com port in device manager of your pc see the pic below.


  • Now click on search button as shown in picture above step 3. 
  • After that your usb modem will be detected and shown in message box see the picture below.
  • Now select the unlocking tab and then click on Unlock step 4 in above picture If you modem is unlocked you will receive a message card successfully unlocked.

Congratulation you have learned how to unlock ZTE MF190 usb dongle successfully.

Source:
Read More

Sunday, November 11, 2012

Jelly Bean transformation pack for windows 7. Hi friends as we have seen many transformation pack that are use to change the look of current running os on your computer to latest version of os such as Windows 7 transformation pack for windows Xp, mac os transformation pack for windows XP or windows 7. So we can say that always user try to archive new feel and look on their current running os. If you are one of them and running Windows 7 then, here is the latest Android Jelly Bean transformation pack.  The truth is that it does not gonna give the look much better than the real built-in packs in devices. This pack is created by skinpacks com so thanks them for providing free. Although this pack transform the look of your windows 7 pc to jelly bean look but also put pressure on system performance many times and can slow your system while multi-tasking.

Screenshot:
Jelly Bean transformation pack for windows 7
So if you love to have different looking os and give your Windows 7 an Android Jelly Bean look then you can use this pack. Once you installed the pack from boot screen, login page and of course the Windows 7 user interface gets jelly bean flavored look and feel you will definitely like it. To provide you with complete jelly bean look the pack has added bunch of programs which we are listing below:
  • RocketDock which a skin just like the OS X’s Dock in Windows
  • Xwidget which is a Jelly Bean like widget
  • Added icons
  • Win7BootUpdater which alters the present boot screen
  • Resource Hacker which modifies .res files
  • Moveex which alters and placing .dll files
  • Universal theme patcher
  • Added Widgets for Google search, music, time and weather
Requirements
Windows 7 Home Premium and above (both 32 bit or 64 bits).
For Windows 7 Home Basic patch must be installed to enable Aero.

Download
Android Jelly Bean Transformation Skin Pack 32 bit(not mirrored)
Android Jelly Bean Transformation Skin Pack 64 bit
(not mirrored)

Installation:
Just Download install and Reboot.

Congratulation! You have transform your Windows 7 running PC to Android 4.1 Jelly Bean like look with the help of skin pack.(source)
Read More

Wednesday, September 19, 2012

How to Share or connect internet from Android phone to laptop using usb cable To share internet from your phone to pc or laptop is very easy below are the steps how to use your phone internet using usb cable.


  • Install kies on your pc or laptop for required driver.
  • Connect your Android phone to pc or laptop using usb cable.
  • Now your phone shows that it is connected by usb in status bar.
  • Go to Home > Settings > Wireless and Networks > Tethering and portable hotspot>USB tethering


Select USB tethering Now your status bar icon changes to blue and you are connected to internet on your pc or laptop start browsing.
Read More

Monday, March 19, 2012

Install Android 4.0 Ice Cream Sandwich on x-86 based pc or laptop
As we have already posted our blog before on how to make boot-able usb of Android x-86 and install Android on x-86 based Pc or laptops But if you are new here then you can visit our previous blog where we have already posted tutorial on how to make bootable usb of Android 2.2 x-86 iso and install it on pc or laptop as the procedure will be same.

Introduction:
So as all of as knows that recently Google's new mobile operating system Android 4.0 Ice Cream Sandwich has been lunched so now we can test this flavour on our x-86 based pc or laptop .What is new in latest android Ice Cream Sandwich It’s fast. Even better, the latest version of Android-x86 comes with access to the Android Market, which means you can try out thousand of Android apps from Android Market which is now known as Google Play.
Important tutorial link:

How to make boot-able usb of Android x-86 iso Click here
How to install Android on X-86 based pc or laptop Click here

Installation:
First of all let me tell you that there are few different version of Ics Android-x86-4.0-RC1 available Here for download now you will have to Grab the version that best fits your pc or laptop if you are not sure which version to download just google to find out which version fits on your pc or laptop
Different versions of android X-86 ics 4.0-RC1 With platform support are:
Android-x86 4.0-RC1 live and installation iso for AMD Brazos platform
Android-x86 4.0-RC1 live and installation iso for ASUS Laptops/Tablets.
Android-x86 4.0-RC1 live and installation iso for ASUS Eee PC family
Android-x86 4.0-RC1 live and installation iso for Lenovo s103t tablet
Android-x86 4.0-RC1 live and installation iso for Tegav2 (Atom N455 tablet)

Now if you have selected the best os version that fits your platform or model number of pc or laptop Download it from this link here it will be .iso file type.
Now lets move to the next step boot-able CD or USB:
As now you have downloaded the appropriate iso for your pc or laptop now you can either burn bootable CD or make a bootable usb. I hope all of as know how to burn bootable image to CD or DVD.
So next is how to make your usb bootable. For tutorial click here
Now lets move to the next step Installation:
As i have already provide you the link above in this post on the tutorial how to install android on x-86 based pc or laptop if escaped click here
ScreenShot:


Conclusion:

Enjoy android.. and don't forget to leave your comments and suggestion
Read More

Thursday, December 1, 2011

How to mount HFS partition on windows.

As we know that windows can mount its own native file system like fat, Ntfs but to mount HFS partition on windows we have to use extra software to access Mac disks from desktop, Windows explorer.We can mount HFS partition as read write with this software can partition, format and repair disk too.As this is not free version you can use trial version.To download the trial version go to the official website Mediafour or click on the link below
MacDrive Standard
After download just install the application and restart your pc lunch the application click on Access HFS partition and then View mac disk in windows explorer your explorer will open and the drive with mac will appear with red apple icon .This is how you can mount mac disk in read write mode in windows.
Read More

Monday, November 14, 2011

How to change start button in windows XP.
How to change label of start button in windows xpChanging start button label "start" of windows xp is not so difficult. You will just have to follow few simple step as described. I have tested and we can use more then five characters, the only thing is that the size of start button increased.One more thing you can use different labels for Windows classic Style and different label for Windows XP style at the same time.The first thing you need to modify the start button of windows xp is a tool called Resource Hacker by Angus Johnson.Resource Hacker can be used to Analyze, change, add, erase or extract resources in EXE and DLL files. You can download Resource Hacker from the link below .The size of resource hacker is only 2.4 MB and it is Free
CLICK to Download
After Downloading install "Resource Hacker" and now go to your windows installation directory that is C:\WINDOWS and make backup of Explorer.exe just copy and past it to some other place like on your desktop so you can backup if some thing go wrong. Now right click the file explorer.exe and select the second option "Open using Resource Hacker". Now Resource Hacker hacker will open the exe for editing. Now you will see two panels right containing description left containing category's .In the left category panel select the String Table category and click on + sign to expand it in the sub category now navigate down to string 37 if you want to change start button for Windows XP Style and click on + sign to expand it select the language string for English version it is 1033 and click on it now see on right panel for this "Start" change the words inside the inverted comma example "Start" to "NandTech" or as you wish and click on Compile Script. To change the start button for Windows Classic Style just select the string 38 from left panel and rest same as above. Now after compiling script go to menu and select save. If your having error cannot create file C:\wind....\.....exe. Open Task Manager by pressing Ctrl+Alt+Del and select the tab Processes now select explorer.exe and click on End Process your windows will close don't worry still your task manager is open select the Application tab of Task Manager and click on New Task new window appears click on Browse and navigate to the place where you backup the file Explorer.exe now select the file explorer.exe and click on open. The explorer will open.now go to Resource Hacker click ok on error message and try again to save this time you will be success. Now as it is saved successfully to see the changes go to Task Manager >> Processes>>select explorer.exe and click on End Process. Now go to Applications tab of Task Manager>>New Task..>Browse...>>"C:\WINDOWS\explorer.exe" and>>open it .That is all you changed the start button label.of windows Xp.
Windows Xp Style Preview

Windows Classic Style preview
If YOU HAVE PROBLEM POST A COMMENT
Read More

Tuesday, November 8, 2011

How to backup Bookmarks

How to backup Bookmarks from Mozilla FireFox 3

Bookmarks are very useful to all of us it is a simplest way to remember the important web site that we visit. We always visit new site for searching whatever information we need through search engine like Google, Bing, yahoo etc. and if we find the site is useful we bookmark it.Simplest way to remember but problem arises when we have some problem in our computer and have to format it. Now big problem arises you loss all your bookmark after reinstalling the operating system.But there is one option always backup your bookmarks.
So here is step wise instruction
How to backup Bookmarks from Mozilla FireFox.
Open your Firefox
Click on Bookmarks from menu bar or alt+B from keyboard
Click on organize bookmarks or ctrl+shift+B from keyboard
Library window appears click on "Import and backup" tab or alt+I from keyboard a drop down menu appears
Now select "Export HTML" option or alt+E from keyboard now save window appears save it.
Now you can restore your book mark when ever you need.
To restore all the steps are same only last step changes here to restore back your book mark you will have to select "Import HTML" option or alt+I from keyboard and select the file you saved while exporting.
how to save bookmark in Firefox 8.0 visit here
Dont forget to leave comment
Read More

Saturday, November 5, 2011

Android App on Windows PC

Run Android Apps on Windows PC

Play Android apps on your Win7 PC or tablet with BlueStacks App Player install talking tom cat on pc
At present BlueStacks has released a free version of emulation software that can run Android app on windows 7 pc and tablet and that allows ten applications to run right out of the box, and a further 26 can be added according to the company. At present it is available only for windows 7. Latter on support for Windows XP/Vista /mac may be available.
The first BlueStacks alpha can be downloaded from the official website.
BlueStacks
Don't forget to leave comment
Read More

Thursday, November 3, 2011

Downloading SFW Files with Firefox
 How to download embedded swf files using firefox. As we know that we need additional software to download swf files that are on webpages but here i am going to show you how to download swf files that are embedded on the webpages without using any additional software.

Download embedded SWF files.

How to download swf files using Firefox.

  •   Download firefox and install to your pc.
  •   Lunch Firefox and navigate to the Webpage that contains the embedded  swf file.
  •   when the page is fully loaded right click on empty space anywhere on the page and select the page info option. As shown below -
  • On clicking  on view page info page info menu will appear, now select Media from the tab.
  • Now select the swf file that you want to download from the list it's type will be embedded.
  • After selection of the file click on Save As button to save swf file to your computer.see the picture below-

 After download  complete you can simply open with your web browser and enjoy it offline.
Don't forget to leave  comment

Read More

Friday, October 28, 2011

GodMode in windows 8

God Mode works in windows 8devlopers preview

As there are secret Settings in windows7 so also in windows 8 developers preview this secret setting is known as “GOD Mode” in windows7orWindows 8 developers preview.It is just like control panel a folder that brings out a long list of secret settings which allows you to change lots of setting of your windows from the same place.
Here is a simple steps to get GodMode in your computer
Create a new folder on your desktop or on any drive you wish
Rename the folder as NandTech.{ED7BA470-8E54-465E-825C-99712043E01C}
Where ''NandTech'' may be changed according to your own wish
After renaming the folder icon changes automatically same as control panel icon. Now you can explore all the hidden secret by double clicking it. It contains 267 items approx

Is it helpful leave your comments below.
Read More

Monday, October 17, 2011

How to hide tray item in windows xp successfully.
Here is simple steps to hide tray items in windows xp. It can be done in Registry Editor of windows.

Step by step how to hide tray item in Windows XP
From start menu click on run
In the run windows that appears type "regedit"
Go to HKEY_CURRENT_USER\Software\Microsoft\Windows\CurrentVersion\Policies
Under policies there is explorer key open that if not present create it.

Under explorer add new DWORD value Name it as "NoTrayItemsDisplay"
Now edit the value of dword select the base as decimal and put value equal to "1"

All done Log Off and again Log On to see the effect .
To get back the tray icon change the value to "0"
Read More

Wednesday, October 12, 2011

Format USB to NTFS in Windows XP trick.
To format usb thumb drive to NTFS in windows xp it's very simple. In windows Xp if you want to format usb removable drives by defult you will only get FAT as an option by default here i am going to tell you how to add NTFS to it.As shown below

Open browser by clicking My Computer icon on desktop or from start menu and right click on the usb drive which you want to format to NTFS and select properties as shown below


On clicking on properties a new window will appears now click on Hardware tab and select the drive which you want to add NTFS formatting option and click on properties button. As shown below


On clicking on properties new window will appear there select policies from the tab now select the radio button saying Optimize for Performance and click on ok the window will close again ok and all windows disappear .

Now go back to windows explorer select the drive you wanted to format to NTFS right click select format a window will appear saying format (usb drive name) now see the line saying file system now click on drop down menu and you will have two option FAT and NTFS. Select NTFS and click on start your usb will be formatted in NTFS. As image below.


One important thing of having NTFS file System is that you can carry a single file larger then 4 GB on it which is not possible in FAT formatted usb Drive.
Read More

Tuesday, October 11, 2011

Windows 8 Bootable USB

Windows 8 Bootable usb

Hi friends
 Today here i am going to write how to make Bootable USB of Windows 8 Devlopers preview.As it is pre-beta version so you can download it for free for final release use your original DVD bought from Microsoft. Here are steps for pre-beta version
          As in previous blog there is a download link of windows 8 Developers preview first off all u have to download the iso image from there.
          Then you will have to mount the downloaded  iso image using some virtual cd/dvd mounter here using
DAEMON Tools.
DOWNLOAD LINK BELOW

http://www.daemon-tools.cc/eng/downloads

This tool is trial for 20 days if you need latter u can buy it. download it and install it reboot your machine after installation now the Daemon Tool icon appears in task-bar see image below


Right click on it and select  

1. Virtual CD/DVD-ROM
2. Device 0:[your device suppose  X:] No media
3. Mount image
          Click on mount image you will get a window now browse your downloaded iso image windows 8 Devlopers Preview and click on open.
Now the image is mounted check it by opening my computer it will appear in Devices and Removable storage as Dvd. Yours suppose x: Drive now you will have to hav 4 GB or above usb thumb drive insert in your usb port backup your data and format it in NTFS recommended Fat32 also works . Latter i will show you how to format usb to ntfs in windows Xp.
   Next the important part Suppose your virtually mounted dvd is X: Drive and your USB thumb Drive is Y: Drive check  your drive letter it is different for all.

Now run command prompt as Administrator
Go to the mounted drive in command prompt as shown below an write the commands given below replace x: and y: with your drive letters.

                   c:\>x:  
            x:\>cd x:\boot
            x:\boot>bootsect.exe /nt60 y:
Now a message will appear saying Bootcode was successfully updated on all targeted volumes.
As in image below
All Done now close the command prompt after that go to My Computer  Explorer your Virtual Dvd Drive here X: Drive and select all the files and folders then copy it then navigate to your usb thumb drive here Y: Drive and paste it. wait for files to be copied 15-30 minutes.

All done 

Reboot machine and boot from usb for installation 

Next coming soon 
Read More

Friday, October 7, 2011

How to install Android 2.2 on pc from thumb drive.
Hi friends before this blog i told how to make bootable usb thumb drive of android os x86 if first time user visit this link android bootable usb
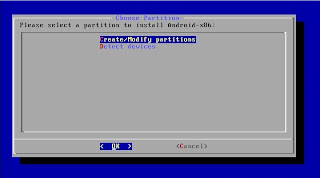
Now step wise installation of android on pc first of all insert your thumb drive in usb port power on your computer and enter bios by hitting "del" button from keyboard my be differ according to your model. in bios go to boot menu and select first boot device as your thumb drive. save and restart.Now machine will boot from thumb drive and you will get selection menu(grub) in this menu there are many option you can test the os without installing it on your hard drive but for installation select the last option (Installation - Install Android-x86 to hard disk) with the help of your keyboard down key and hit enter see the image below
Installation of Android on pc
If your hard drive is new and have not been partitioned you will get this screen ( else you will get picture no. 4 in this blog ) select the first option to create/modify partition and select ok as in image below

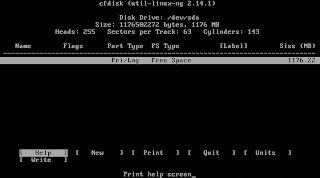
Here you can create the partition table. ( 3 GB will be sufficient ) if creating new partition select "write " and hit enter .you can make more partitions also as your hard drive is new.

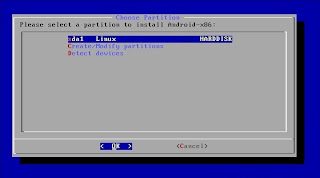
Now select the partition you made for installation here i have only one partition Linux -harddisk now select ok and hit enter ( as told above this is the picture no. 4 for those whose hard drive has been already formatted and have partition table you will get this screen. )


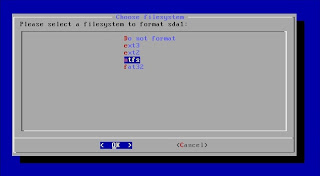
Now if created new partition format with your desired file system both Linux and windows file system are supported there is another option " Do not format" for already formatted drive suppose if your C drive have windows already install and have enough space and want to install on the same drive with out formatting you can use this option use at your own risk. But better to use separate drive. Now select your desired option and select OK.

Next select yes to install grub if skip you will not be able to boot

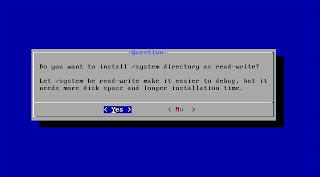
Next to select if you want to install system in read-write mode or only read mode better in read-write mode up to your choice select Yes for read-write mode and No for read only mode.

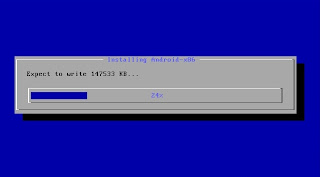
Now the system installation begins takes 5-10 minutes according to your cpu speed etc.

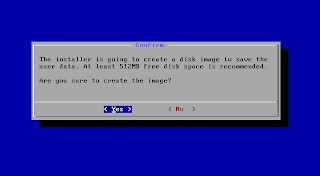
Next creation of disk image to save user data click on yes About 512 MB

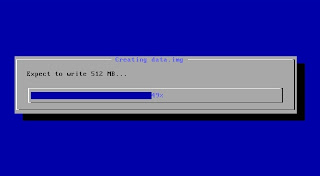
Next disk image will be created 5-10 minutes required

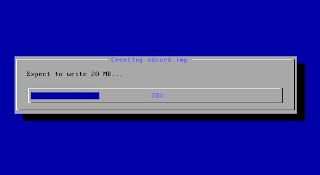
Now the important part as the installation is finish but for further installation of application you will need space as the os is android so you need memory card so before restart create a Fake SD Card very important 2 GB will sufficient. Then select ok and hit enter.

Here I just created 20 MB as my partition was only of 1 GB but you can take more space according to your choice. I have not tried above 2 GB. Now let the fake sd card to be created 5-15 minutes will be required.

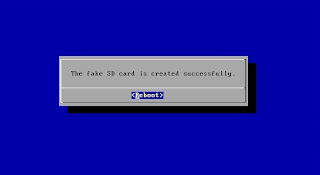
Now your fake sd card is created you can reboot.

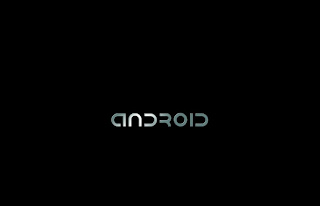
On reboot change your boot option in bios and select first boot device as your hard drive save and reboot. On reboot you will get grub where you can choice the os you want to run if you select android you will get this boot screen

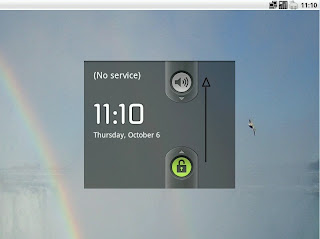
After that you will get logon screen just with the help of mouse drag the lock symbol towards the volume symbol now you are log in.

Now enjoy android on pc
Read More
Related Posts Plugin for WordPress, Blogger...
Google Google+