Friday, October 28, 2011

GodMode in windows 8

God Mode works in windows 8devlopers preview

As there are secret Settings in windows7 so also in windows 8 developers preview this secret setting is known as “GOD Mode” in windows7orWindows 8 developers preview.It is just like control panel a folder that brings out a long list of secret settings which allows you to change lots of setting of your windows from the same place.
Here is a simple steps to get GodMode in your computer
Create a new folder on your desktop or on any drive you wish
Rename the folder as NandTech.{ED7BA470-8E54-465E-825C-99712043E01C}
Where ''NandTech'' may be changed according to your own wish
After renaming the folder icon changes automatically same as control panel icon. Now you can explore all the hidden secret by double clicking it. It contains 267 items approx

Is it helpful leave your comments below.
Read More

Monday, October 17, 2011

How to hide tray item in windows xp successfully.
Here is simple steps to hide tray items in windows xp. It can be done in Registry Editor of windows.

Step by step how to hide tray item in Windows XP
From start menu click on run
In the run windows that appears type "regedit"
Go to HKEY_CURRENT_USER\Software\Microsoft\Windows\CurrentVersion\Policies
Under policies there is explorer key open that if not present create it.

Under explorer add new DWORD value Name it as "NoTrayItemsDisplay"
Now edit the value of dword select the base as decimal and put value equal to "1"

All done Log Off and again Log On to see the effect .
To get back the tray icon change the value to "0"
Read More

Wednesday, October 12, 2011

Format USB to NTFS in Windows XP trick.
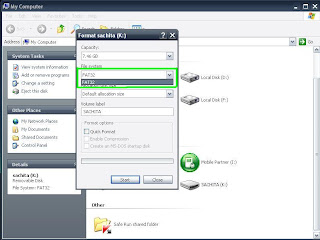
To format usb thumb drive to NTFS in windows xp it's very simple. In windows Xp if you want to format usb removable drives by defult you will only get FAT as an option by default here i am going to tell you how to add NTFS to it.As shown below

Open browser by clicking My Computer icon on desktop or from start menu and right click on the usb drive which you want to format to NTFS and select properties as shown below


On clicking on properties a new window will appears now click on Hardware tab and select the drive which you want to add NTFS formatting option and click on properties button. As shown below


On clicking on properties new window will appear there select policies from the tab now select the radio button saying Optimize for Performance and click on ok the window will close again ok and all windows disappear .

Now go back to windows explorer select the drive you wanted to format to NTFS right click select format a window will appear saying format (usb drive name) now see the line saying file system now click on drop down menu and you will have two option FAT and NTFS. Select NTFS and click on start your usb will be formatted in NTFS. As image below.


One important thing of having NTFS file System is that you can carry a single file larger then 4 GB on it which is not possible in FAT formatted usb Drive.
Read More

Tuesday, October 11, 2011

Windows 8 Bootable USB

Windows 8 Bootable usb

Hi friends
 Today here i am going to write how to make Bootable USB of Windows 8 Devlopers preview.As it is pre-beta version so you can download it for free for final release use your original DVD bought from Microsoft. Here are steps for pre-beta version
          As in previous blog there is a download link of windows 8 Developers preview first off all u have to download the iso image from there.
          Then you will have to mount the downloaded  iso image using some virtual cd/dvd mounter here using
DAEMON Tools.
DOWNLOAD LINK BELOW

http://www.daemon-tools.cc/eng/downloads

This tool is trial for 20 days if you need latter u can buy it. download it and install it reboot your machine after installation now the Daemon Tool icon appears in task-bar see image below


Right click on it and select  

1. Virtual CD/DVD-ROM
2. Device 0:[your device suppose  X:] No media
3. Mount image
          Click on mount image you will get a window now browse your downloaded iso image windows 8 Devlopers Preview and click on open.
Now the image is mounted check it by opening my computer it will appear in Devices and Removable storage as Dvd. Yours suppose x: Drive now you will have to hav 4 GB or above usb thumb drive insert in your usb port backup your data and format it in NTFS recommended Fat32 also works . Latter i will show you how to format usb to ntfs in windows Xp.
   Next the important part Suppose your virtually mounted dvd is X: Drive and your USB thumb Drive is Y: Drive check  your drive letter it is different for all.

Now run command prompt as Administrator
Go to the mounted drive in command prompt as shown below an write the commands given below replace x: and y: with your drive letters.

                   c:\>x:  
            x:\>cd x:\boot
            x:\boot>bootsect.exe /nt60 y:
Now a message will appear saying Bootcode was successfully updated on all targeted volumes.
As in image below
All Done now close the command prompt after that go to My Computer  Explorer your Virtual Dvd Drive here X: Drive and select all the files and folders then copy it then navigate to your usb thumb drive here Y: Drive and paste it. wait for files to be copied 15-30 minutes.

All done 

Reboot machine and boot from usb for installation 

Next coming soon 
Read More

Friday, October 7, 2011

How to install Android 2.2 on pc from thumb drive.
Hi friends before this blog i told how to make bootable usb thumb drive of android os x86 if first time user visit this link android bootable usb
Now step wise installation of android on pc first of all insert your thumb drive in usb port power on your computer and enter bios by hitting "del" button from keyboard my be differ according to your model. in bios go to boot menu and select first boot device as your thumb drive. save and restart.Now machine will boot from thumb drive and you will get selection menu(grub) in this menu there are many option you can test the os without installing it on your hard drive but for installation select the last option (Installation - Install Android-x86 to hard disk) with the help of your keyboard down key and hit enter see the image below
Installation of Android on pc
If your hard drive is new and have not been partitioned you will get this screen ( else you will get picture no. 4 in this blog ) select the first option to create/modify partition and select ok as in image below

Here you can create the partition table. ( 3 GB will be sufficient ) if creating new partition select "write " and hit enter .you can make more partitions also as your hard drive is new.

Now select the partition you made for installation here i have only one partition Linux -harddisk now select ok and hit enter ( as told above this is the picture no. 4 for those whose hard drive has been already formatted and have partition table you will get this screen. )


Now if created new partition format with your desired file system both Linux and windows file system are supported there is another option " Do not format" for already formatted drive suppose if your C drive have windows already install and have enough space and want to install on the same drive with out formatting you can use this option use at your own risk. But better to use separate drive. Now select your desired option and select OK.

Next select yes to install grub if skip you will not be able to boot

Next to select if you want to install system in read-write mode or only read mode better in read-write mode up to your choice select Yes for read-write mode and No for read only mode.

Now the system installation begins takes 5-10 minutes according to your cpu speed etc.

Next creation of disk image to save user data click on yes About 512 MB

Next disk image will be created 5-10 minutes required

Now the important part as the installation is finish but for further installation of application you will need space as the os is android so you need memory card so before restart create a Fake SD Card very important 2 GB will sufficient. Then select ok and hit enter.

Here I just created 20 MB as my partition was only of 1 GB but you can take more space according to your choice. I have not tried above 2 GB. Now let the fake sd card to be created 5-15 minutes will be required.

Now your fake sd card is created you can reboot.

On reboot change your boot option in bios and select first boot device as your hard drive save and reboot. On reboot you will get grub where you can choice the os you want to run if you select android you will get this boot screen

After that you will get logon screen just with the help of mouse drag the lock symbol towards the volume symbol now you are log in.

Now enjoy android on pc
Read More

Thursday, October 6, 2011

Android on pc

How to make bootable usb of android-x86 and install on pc
Hi friends today i am going to write about a os which is becoming very popular now a days this os are mainly found on smart phones and tab. etc. but now we can install it on pc.
The os is named as Android from google.
Android on pc
Download link below
For installation first of all u have to download  the iso file from Android-x86
An open source project to provide android support on x86.There are different iso for netbook and laptops x86based machines.
First of all to install os we must have installation disk so here is download link below.
Android-x86-2.2-generic.iso Size:82.4MB
http://code.google.com/p/android-x86/downloads/detail?name=android-x86-2.2-generic.iso&can=2&q=
For your choice see here http://www.android-x86.org/download
After downloading the os iso fron above link burn it to cd or dvd.or u can prepare bootable usb.
Here we will use usb thumb drive to install Android on pc.
To install from thumb drive first of all we have to download software that can make our usb thumb drive bootable from http://unetbootin.sourceforge.net/
You can download according to your platform windows, Linux or mac.
Here i am going to use windows version now. After downloading
UNetbootin run it you will get this window
As android is in listed in distribution select fedora in first dropdown and for second dropdown 14_live etc. as in picture below
After that click on radio button Diskimage browse the iso image from your hd just you downloaded from above link.TheType of disk will be usb drive. Now drive will be your thumb drive path here it is l:/ yours may be different select properly see image below

Now click on ok wait for some time let it be complete
Now you are ready to install Android on pc from thumb drive.
enjoy......
Next...... how to install
visit the link below how to install Android on pc
Installation of Android on PC
Read More
Related Posts Plugin for WordPress, Blogger...
Google Google+